Showing posts with label Painted Accessories. Show all posts

Sunday, August 12, 2012

CD Rack Trellis

Spray paint
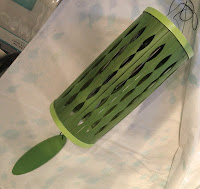
A few months ago, I found a CD Rack at a yard sale.  It was marked $4.00, but I was able to talk my way to $2.00 for this gem.  As soon as I saw the rack, I knew it would someday be either a topiary or a trellis for a blooming vine of some sort.  That day is today, and here is my up-cycled CD Rack-turned-trellis.
Green Apple spray paint
by Rustoleum
$2.00 CD Rack
from a yard sale.
SPRAY PAINT: I painted it satin green apple (Rustoleum Ultra Cover Spray Paint).

Whimsical dots added with the handle end
of the craft paint brush.
CRAFT PAINT: I painted every other rung on the front with outdoor craft paint.  Next, I added dots to create a whimsical look. These dots are really easy to create.  Just dip the handle end of a craft brush in the paint, then dot it onto the item.  It creates great little dots every time.  To make bigger dots, use a bigger brush.

MOUNTING and PLANTING:  I mounted my new trellis on the fence next to my shed and planted a pink blooming Allamanda vine underneath it.

Mounted CD Rack Trellis on the fence
above a pink blooming Allamanda vine.

Mounted CD Rack Trellis next to the shed.
Won't it be beautiful as the vines grow through it?

Sunday, July 8, 2012

Painted Wind Chime

I found this simple green wind chime at Home Goods on clearance.  It has a beautiful ring to it, but was way too boring for me.

Wind Chime  "Before"
Wind Chime  "After"
I masked off the body of the chime and sprayed the top and bottom Green Apple.  Next, I stenciled a vine pattern around the top in light blue and repeated the stencil on the chime weight.  I outlined the stenciled vine in lime green to give it definition.

Wrapped the body of the chime to prep for spray paint.
Spray painted the top and bottom border Green Apple.
Stenciled a vine pattern around the top, and on the chime weight.

Outlined the blue stenciled vine in green.


I masked off stripes and painted them two-toned blue-green, then removed the tape and painted a thin blue lne on the top and bottom to accentuate the stripe design.

Masked off stripes, then painted two-tone blue and green stripes.

Added a thin blue line to accentuate the stripes and
 also outlined the chime weight in  a blue line.

Completed wind chime in my garden next to my shed.


Friday, July 6, 2012

Rescued Oriental Lanterns

I rescued two oriental lanterns from the dumpster a few months back.   I had no idea what I'd do with them at the time, but when I was painting my bamboo chairs, I sprayed these Green Apple.  Please excuse the "before" picture.  I sprayed the bottom of the lanterns with paint then realized that I needed to take a "before" picture...this was the best I could do.


Hanging Lantern "Before".  
They're spray painted with Green Apple

Rustoleum painter's touch
Satin Green Apple


Painted in pastel blue, purple, and pink over the green apple.
Finished lanterns find a home in the flower garden next to the shed.
Next I painted them in pastel colors, then added whimsical polka dots.  They found a beautiful spot in the yard next to my newly remodeled shed.
Finished Oriental Lanterns - view from below.


Thursday, June 28, 2012

Live, Learn, Laugh, Love, Life - A plaque makeover

Now that I've completed my shed makeover (guest posted today at My Repurposed Life), I have been looking for fun things to hang on my blank fence next to the shed.  While driving back from my Saturday running club, I hit the breaks for a garage sale because I saw this propped up against a treadmill:

I picked it up for $5, and brought it home to paint.

First, I primed it with Zinsser and my paint sprayer.


 Next, I spray painted it with Rustoleum Satin outdoor spray paint in a sage green.

Blended colors for each letter
Then, I painted each of the letters in a different blended color.  I'm a fan of Donna Dewsburry's one stroke painting technique, so I used her method of loading the paint brush with two colors to blend two colors for each word.

Loading 2 paint colors onto the brush

After dipping the corner of the brush into each paint color,
I work the paint into the brush by  moving it back and forth in the paint.


Scruffy brush used to create faux moss.
Next, I added "moss" around the edges using a flat headed "scruffy" brush loaded with yellow and green paint, then "pounced" around all the edges of the plaque.
Live Learn Laugh Love Life - Simple rules to live by!
Here's the finished product!

I need your help!  Should I add an additional layer of varnish or glazing to add a patina?  Or...should I leave well enough alone?  Let me know what you think!


Coincidentally, Cottage and Vine also did a great makeover of this same plaque - check out her version!

Monday, June 4, 2012

Old Birdcage turned New Hanging Planter

I bought this old birdcage a few years ago in an antique shop during a trip to Boston.  I took it out of storage this weekend and decided to make a hanging planter with it.

First, I painted it "Green Apple" with Rustoleum Painter's Touch.  I must tell you -- This is THE BEST spray paint.  It usually only takes one coat when other spray paint takes 2-3 coats.  It is higher priced, but you use less - well worth it!
First, I painted it "Green Apple".
After Spray Paint
Next, I added a Coconut Basket liner to cover the bottom.
Coconut basket liner cut to fit the bottom.
Then I added sphangum moss around the edges to hold in the soil.
I put some soil in the middle, then planted a tall purple butterfly plant in the middle. Around the outside, I planted trailing plants on their side so that they grow through the cage.  Added more sphangum moss on the sides and soil on top.  Then I mulched the top with more sphangum moss, and watered!
Finished Birdhouse Planter....now, where to hang it?